There’s a strange nostalgia in turning simple brownies into tiny, bandaged monsters. I remember huddling around the kitchen table, giggling while wrapping marshmallows in melted chocolate. This recipe isn’t just about the treat; it’s about reliving those goofy, spooky childhood moments.
Making mummy brownies feels like a sweet little act of defiance against the chaos of everyday life. It’s messy, playful, and surprisingly easy. Plus, the scent of melted chocolate and vanilla fills the house like a cozy spell—perfect for late October or just a rainy weekend.
What I love most is how these little monsters turn into a hands-on project that anyone can do. They’re perfect for kids or for that weird part of you that still loves Halloween. Sometimes, the simplest recipes make the best memories—this one’s no exception.
Why I Can’t Stop Smiling at These Mummy Brownies
- I secretly enjoy the chaos of wrapping marshmallows—like crafting tiny, edible sculptures.
- Their playful look makes me feel like a kid again, hiding in the kitchen after dark.
- It’s a recipe that’s as fun to make as it is to eat, with that perfect fudgey bite.
- Seeing everyone’s surprised faces when they see the little mummies is priceless.
- Sometimes, I just need a sweet project that’s quick, fun, and a little bit silly.
My Ingredient Confessional: What’s Really in These Little Spooks
- Dark chocolate: I prefer a rich, slightly bitter chocolate that melts smoothly, but milk chocolate works if you want it sweeter.
- Butter: Adds that shiny, fudgy texture—skip margarine unless you want a different flavor.
- Sugar: Just enough to balance the bitterness, but don’t overdo it or the brownies get too sweet.
- Eggs: They help set the brownies—don’t skip them unless you’re vegan; then, try applesauce.
- Flour: All-purpose, plain, and reliable—no need for fancy alternatives here.
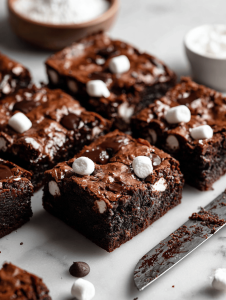
- Marshmallows: Oozing and sticky, perfect for wrapping in chocolate bandages—use mini ones for easier work.
- Chocolate chips or white chocolate: For the mummy eyes—think of the contrast and the fun of tiny, bright dots.
Crafting Your Spooky Little Monsters: The How-To
Equipment & Tools
- Mixing bowls: For melting and blending the chocolate.
- Double boiler or microwave: To melt the chocolate gently.
- Spatula: For folding and spreading.
- Baking pan (20x20cm): To hold your brownies.
- Toothpicks or small forks: For shaping marshmallows.
- Small piping bag or plastic squeeze bottle: To add the eyes.
Mise en place
- Preheat oven to 180°C (350°F). Grease your baking pan.
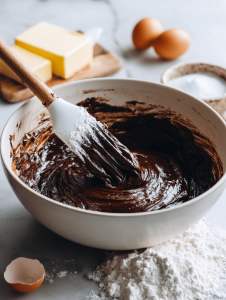
- Melt the chocolate and butter together. Let it cool slightly.
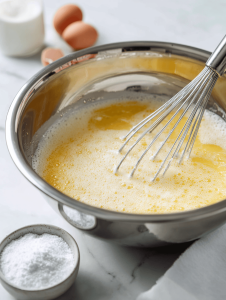
- Beat eggs and sugar until fluffy. Mix in the melted chocolate.
- Fold in flour until just combined. Pour into pan.
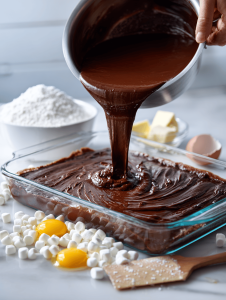
- Chop marshmallows in half for bandages. Prepare chocolate for drizzling and eyes.
Steps
- Bake for 20-25 minutes until the edges are set and a toothpick comes out with moist crumbs. Cool in pan for 10 minutes.
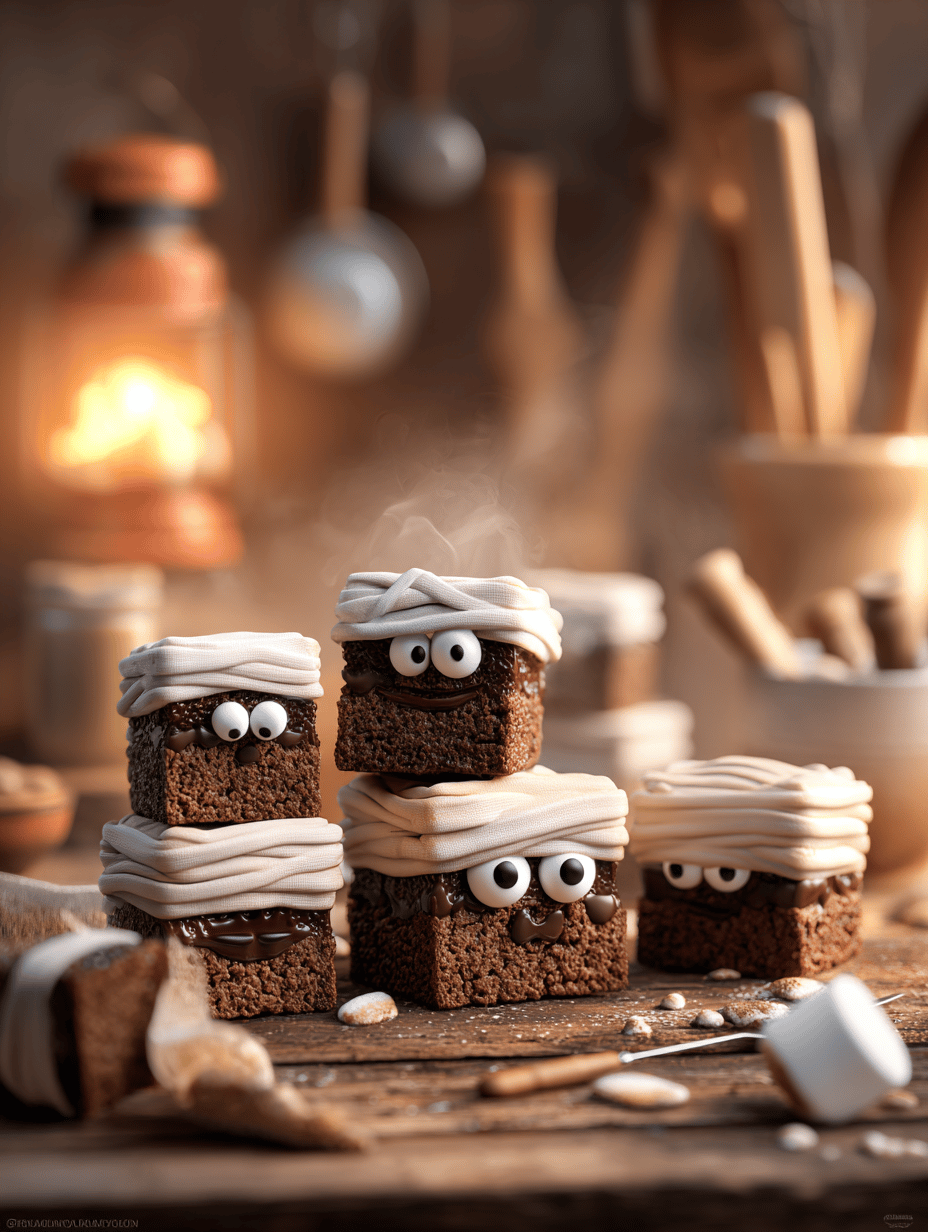
- Cut marshmallows in half. Using a toothpick, dip into melted chocolate and wrap around marshmallows, leaving the top exposed as a ‘head’.
- Arrange marshmallow ‘mummies’ on the cooled brownies. Let the chocolate set for 15 minutes.
- Use piping bag to dot white chocolate for eyes. Place small chocolate chips or white chocolate chips for pupils.
- Chill the brownies in the fridge for 30 minutes for best set. Serve with a grin.
How to Know It’s Ready
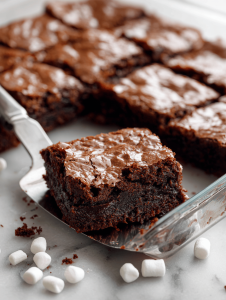
- The brownies are firm around the edges but still fudgy in the middle.
- Chocolate eyes hold their shape but aren’t hard or brittle.
- Marshmallow bandages stay in place without sliding off.
Oops Moments and How to Fix Them
- FORGOT to preheat? Start oven early next time—hot oven helps set brownies faster.
- DUMPED too much chocolate in? Add a bit more flour or eggs to balance the moisture.
- OVER-TORCHED marshmallows? Use less heat or microwave in short bursts, then work quickly.
- MARSHMALLOW slipping? Chill the brownies longer or use firmer marshmallows.
Quick Fixes for Kitchen Chaos
- When eyes melt, splash cold water on the chocolate before piping again.
- Patch cracks with a dusting of powdered sugar or cocoa powder.
- Shield marshmallows with a light drizzle of extra melted chocolate for extra adhesion.
- If brownies are too fudgy, reheat briefly to soften before decorating.
- Sprinkle a pinch of sea salt on top for a smoky contrast, especially when the chocolate is rich.
In the end, it’s about the silly joy of creating something that makes people smile. These mummy brownies aren’t just treats—they’re tiny, edible memories you get to build. Sometimes, the best recipes are the ones that let you get a little messy and a little creative.
And after all that wrangling with marshmallows and chocolate, it’s nice to settle in with a plate of these spooky little monsters. They’re imperfect, charming, and just the right touch of chaos for a cozy, spooky day.
Mummy Brownies
Ingredients
Equipment
Method
- Preheat your oven to 180°C (350°F) and lightly grease your baking pan to prevent sticking.
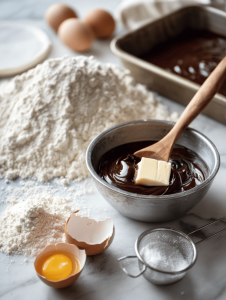
- Chop the dark chocolate and melt it together with the butter using a double boiler or microwave, stirring until smooth and shiny. Set aside to cool slightly.

- In a large bowl, whisk the eggs and sugar until the mixture is fluffy, light in color, and smells sweet—about 2-3 minutes.
- Pour the slightly cooled melted chocolate mixture into the egg mixture and fold gently with a spatula until well combined.

- Sift in the flour and fold it into the batter just until no streaks remain, being careful not to overmix.
- Pour the batter into the prepared baking pan and spread evenly with a spatula. Bake for 20-25 minutes until the edges are set and a toothpick inserted in the center comes out with moist crumbs.
- Remove the brownies from the oven and let them cool in the pan for about 10 minutes until firm enough to handle.

- Cut the mini marshmallows in half, then dip the cut sides briefly into melted chocolate using a toothpick or fork, and wrap them around the edges of each brownie, leaving the top exposed as the 'head' of the mummy.

- Arrange the marshmallow 'mummies' on the cooled brownies and let the chocolate set for about 15 minutes, so they stay in place.
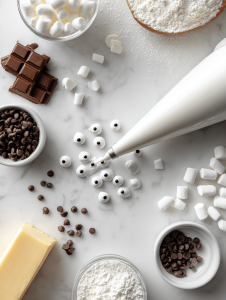
- Use a piping bag or squeeze bottle to dot small white chocolate or melted white chocolate for the eyes. Place tiny chocolate chips or small white chocolate chips on top for pupils.
- Transfer the completed brownies to the refrigerator and chill for at least 30 minutes to help everything set firmly.
- Once chilled, cut into squares, serve with a playful grin, and enjoy these spooky, fudgy treats!
Notes
So, next time you want to add a dash of fun to your baking, whip up these mummy brownies. They’re quick, forgiving, and perfect for sharing—if you’re willing to part with a few. The best part? Watching everyone’s face light up when they see the tiny, bandaged faces staring back.
They might not win any culinary awards, but they sure do bring a splash of silly joy. Plus, they’re a reminder that sometimes, the messiest, most imperfect treats are the most memorable ones.