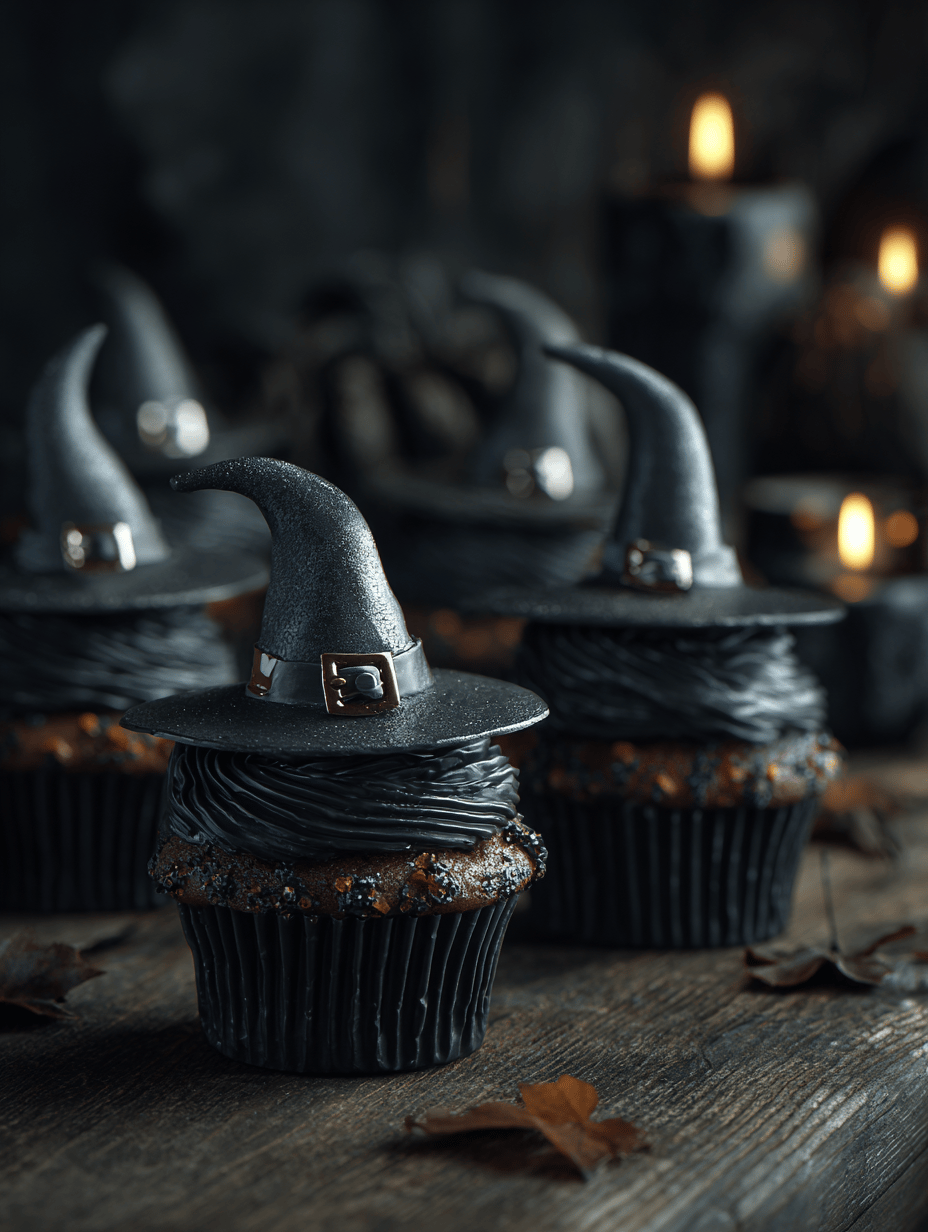
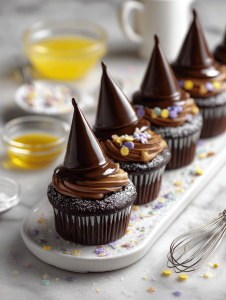
Halloween is creeping closer, and I find myself craving something both playful and a little sinister. These witch hat cupcakes are more than just treats—they’re tiny spells, crafted with a touch of whimsy and a dash of chaos. Every step feels like casting a little magic, from swirling the dark chocolate frosting to shaping the sugar cones into miniature hats.
I love how these cupcakes turn a simple vanilla sponge into a costume party for your taste buds. They’re perfect for sneaking into a dessert spread, or just making a regular day feel a bit more enchanted. Plus, they’re surprisingly easy to assemble, once you get the hang of that witchy shape!
When I make these, I think about childhood Halloweens filled with giggles and candy. There’s a nostalgic thrill in creating something so spooky and cute at the same time. And honestly, seeing everyone’s surprised faces when they realize they’re actually cupcakes makes all the mess worthwhile.
Why I Can’t Get Enough of These Witch Hat Wonders
- Joy—nothing beats the giggle fit when someone spots the tiny hat on top of a cupcake.
- Chaos—shaping sugar cones feels like a mini baking adventure, and some hats come out a little wobbly—and that’s part of the charm.
- Nostalgia—these remind me of childhood Halloweens, sneaking candy and dressing up in silly costumes.
- Practicality—super easy to prep ahead, making them perfect for last-minute parties or spontaneous spooky brunches.
- Creativity—each hat is a tiny canvas, so I love experimenting with different toppings and decorations.
Ingredient Secrets & Spooky Substitutions
- Vanilla Sponge Cake: I use a simple homemade recipe, but store-bought works in a pinch. Look for a light, fluffy texture that holds up well.
- Chocolate Frosting: Rich, dark, and gooey—use quality cocoa for that smoky depth. Swap with caramel if you want a sweeter, gooey surprise.
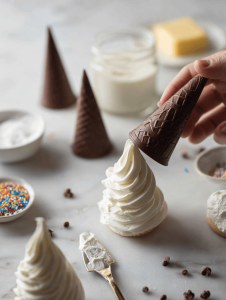
- Sugar Cones: The perfect tiny hat base—crisp and slightly sweet. You can try waffle cones for a more decadent look.
- Food Coloring: Black and purple are classic, but a splash of green can give a wicked glow. Use gel colors for intensity.
- Decorative Accents: Candy eyes or sprinkles add a playful touch—think about lemon-bright or smoky flavors for contrast.
- Optional fillings: Cherry jam or lemon curd inside the cupcake adds a surprise twist—just a spoonful before baking.
Crafting Your Spooky Little Hats
Tools & Equipment
- Mixing bowls—big enough for batter and frosting.
- Electric mixer—makes fluffy batter and smooth frosting.
- Spatula—scraping and spreading with ease.
- Silicone piping bags—easy to control for frosting swirls.
- Miniature sugar cones—base for the hats.
- Black gel food coloring—dye the frosting.
- Small decorating brushes—detail work for hat brims or band.
Mise en Place
- Preheat oven to 180°C (350°F). Line cupcake tin with paper liners.
- Prepare sugar cones—trim slightly if needed to fit cupcake tops.
- Measure out all ingredients—mise en place makes assembly smoother.
- Color the frosting—divide into bowls and tint with gel food coloring.
- Gather decorations—eyes, sprinkles, or edible glitter.
The Spell of Making
- Mix the vanilla cake batter, filling cupcake liners about 2/3 full. Bake 18–20 mins, until golden and a skewer comes out clean.
- Let cupcakes cool 10 mins, then remove from tins. Cool completely on wire racks.
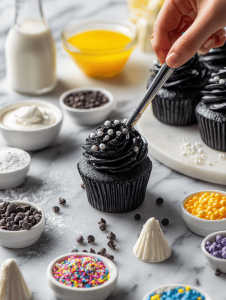
- Frost cupcakes with dark chocolate frosting, swirling decoratively. Set aside.
- Attach sugar cones on top of each cupcake, pressing gently to secure. Frost the cone to blend into the cupcake.
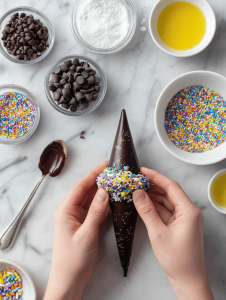
- Decorate the cone as a hat—add bands, accents, or edible glitter for a mysterious shimmer.
- Let the frosting set 15 mins before handling further.
Rest & Reveal
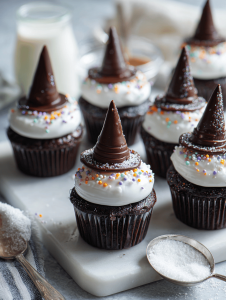
Allow cupcakes to rest at room temp for 10 mins, so frosting firms up. Serve once the hats are steady and the decorations are shiny. They’re best enjoyed within a day or two for that fresh, crispy cone crunch.
How to Know It’s Perfect
- Skewer test: Insert a toothpick, it should come out clean from the cupcake center.
- Frosting: Should be firm but smooth, with no sagging or cracking.
- Hats: Sugar cones should be crisp and hold their shape without wobbling.
Oops Moments & How to Fix Them
- FORGOT to preheat? Crumble the cupcakes and make cake pops instead.
- DUMPED frosting? Warm it slightly to loosen or refrigerate to stiffen.
- OVER-TORCHED cones? Quickly dip in a warm sugar syrup—restored shine and crunch.
- Hats wobbling? Add a tiny dab of frosting underneath for extra grip.
Kitchen Hacks & Spooky Save-Ins
- When frosting is too stiff, splash in a teaspoon of milk to loosen it.
- Patch cracks in sugar cones with a dab of melted chocolate.
- Shield wobbly hats with a small dollop of frosting underneath.
- When in doubt, sprinkle edible glitter for instant spooky shimmer.
- Splash lemon juice into frosting for a zingy contrast that shimmers on your tongue.
Making these witch hats is a chaotic little ritual, and that chaos is part of the fun. It’s the kind of project that makes you smile, even if some hats end up a little wobbly or quirky. It’s all about the joy of creating something with your hands, and sharing it with others who appreciate the small, sweet magic.
In the end, these cupcakes aren’t just treats—they’re tiny celebrations of spooky season, made with a bit of chaos and a lot of love. Whether you’re baking for friends or just for yourself, they’re perfect for turning any ordinary day into a little Halloween story.
Witch Hat Cupcakes
Ingredients
Equipment
Method
- Preheat your oven to 180°C (350°F) and line a cupcake tin with paper liners. In a large bowl, whisk together the sifted flour, sugar, and cocoa powder to combine evenly.
- Add the softened butter, eggs, milk, and vanilla extract to the dry ingredients. Use an electric mixer to beat everything on medium speed until the batter is smooth, fluffy, and free of lumps, about 2-3 minutes.
- Divide the batter evenly among the cupcake liners, filling each about two-thirds full. Bake in the preheated oven for 18-20 minutes, or until a toothpick inserted into the center comes out clean and the cupcakes are golden.
- Remove the cupcakes from the oven and let them cool in the tin for 10 minutes. Then transfer them to a wire rack to cool completely, which helps prevent sogginess and makes frosting easier.
- While the cupcakes cool, prepare the frosting by beating softened butter until creamy. Gradually add powdered sugar and cocoa powder, mixing on low speed at first, then increasing to high until smooth and fluffy.
- Transfer the frosting into a piping bag fitted with a decorative tip. Swirl the dark chocolate frosting generously on top of each cooled cupcake, creating a textured, spooky surface.
- Gently press a sugar cone onto the center of each cupcake, pressing down slightly so the frosting adheres and the cone sits securely. Use extra frosting to blend the base of the cone into the cupcake if needed.

- Decorate the sugar cone hats with edible accents like candy eyes, sprinkles, or edible glitter to give your witches some personality and a magical shimmer.
- Let the decorated cupcakes sit at room temperature for about 15 minutes to allow the frosting and decorations to set firmly in place.
- Once the frosting is firm and the decorations are shiny, arrange the cupcakes on a serving platter. Enjoy these whimsical, spooky treats that are perfect for Halloween festivities!
Notes
As the last of the cupcakes disappear, I find myself already thinking about next time. Maybe some with glittery spider webs or little ghost faces. The magic is really in the making and the sharing, even if some hats don’t quite stand tall.
In the end, it’s just a batch of cupcakes that turned into tiny, edible costumes. But honestly, that’s enough to make any day feel a little more special—spooky, sweet, and a little bit silly all at once.