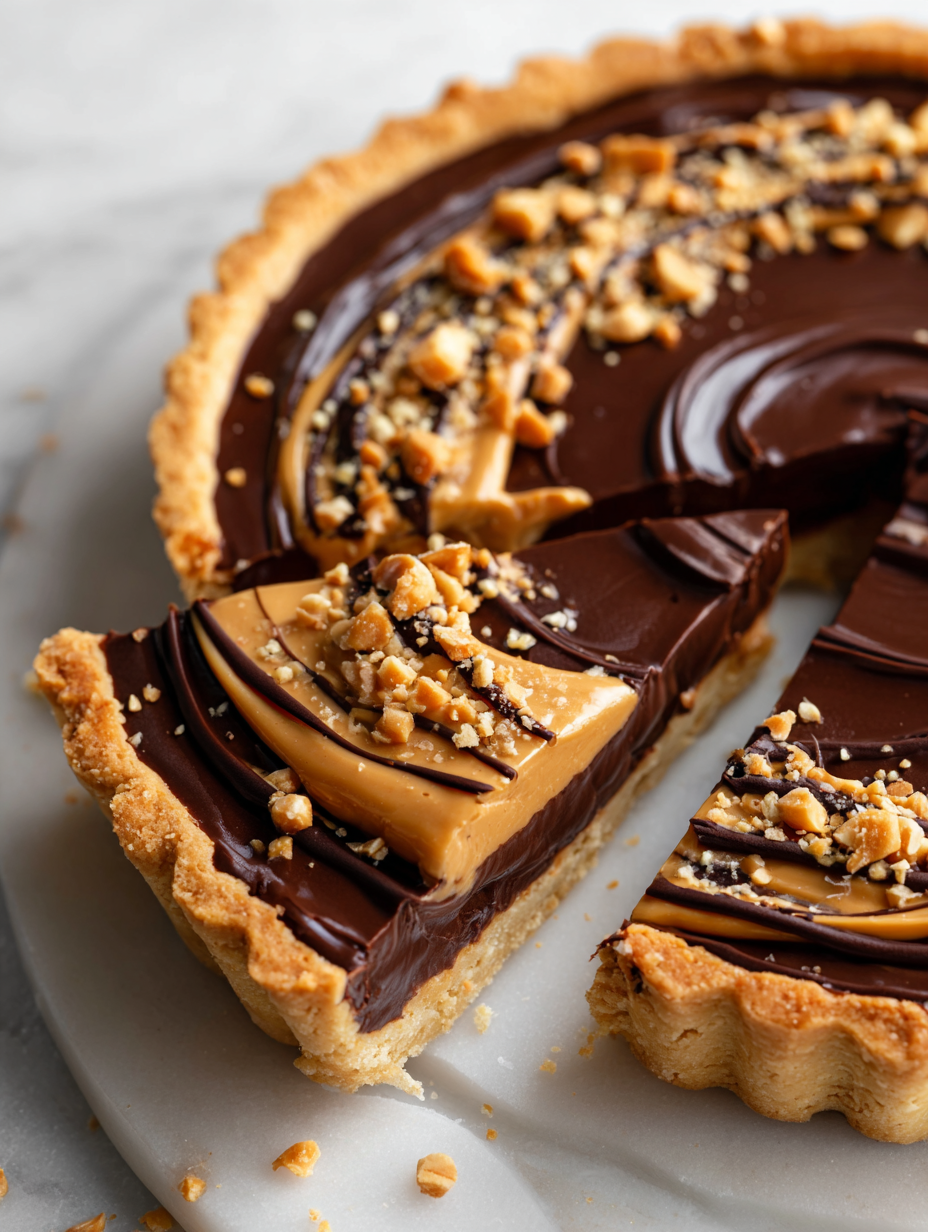
This Chocolate Peanut Butter Tart is a nod to childhood comfort, but with a grown-up twist. The creamy, bittersweet chocolate and smooth, salty peanut butter come together in a crust that’s just sturdy enough to hold all that luscious filling. It’s a dessert that feels indulgent but manages to feel familiar, like a warm memory you can hold in your hands.
I love how the flavors balance out—rich, dark chocolate with that salty pop of peanut butter, all in one bite. It’s the kind of dessert that makes you pause, savor, and maybe even close your eyes for a second. Perfect for when you want something sweet that also sparks a little nostalgia, but with a little more sophistication.
Focusing on the nostalgic comfort of childhood favorites, this tart combines the rich, indulgent flavors of chocolate and peanut butter in a sophisticated, adult-appropriate way, emphasizing the sensory experiences of creamy textures and bittersweet notes that evoke both joy and memories.
Childhood Comfort with a Sophisticated Twist
- Biting into this tart takes me straight back to lazy Sunday afternoons in my grandma’s kitchen, the smell of melting chocolate lingering in the air.
- There’s a quiet joy in balancing the salty peanut butter with the dark, bittersweet chocolate—each bite feels like a little rebellion of flavor.
- I love how the creamy texture melts in your mouth, making it feel decadent yet somehow comforting, like a secret kept just for me.
- This recipe reminds me that sometimes, the simplest ingredients can create the most memorable moments of indulgence.
The story behind this recipe
- This tart came about after a late-night craving for something nostalgic but with a grown-up edge. I remembered how my childhood afternoons were filled with peanut butter and chocolate, simple and sweet, yet somehow always satisfying. I wanted to recreate that feeling, but make it a bit more refined, suitable for sharing at dinner parties or quiet weekends alone.
- It’s funny how a flavor combo can stick with you—rich, salty peanut butter paired with dark, slightly bitter chocolate, both textures melting together in one bite. I kept thinking about how to balance that sweetness with a little sophistication, and this tart was born from that little kitchen experiment that turned into a favorite.
- heading: ‘The story behind this recipe
Historical and Cultural Tidbits
- This tart’s flavor combo traces back to 1950s American home baking, where peanut butter and chocolate became a staple for nostalgic desserts.
- The peanut butter and chocolate pairing was popularized by early candy bars, but turning it into a tart elevates it into a sophisticated treat.
- In some regions, this dessert is a modern reinterpretation of classic Southern pies, blending comfort with elegance.
- The idea of combining salty and sweet in a tart form gained popularity in the artisanal baking scene in the early 2000s, making this a contemporary classic.
Ingredient breakdown
- Dark chocolate: I prefer a high cocoa percentage, around 70%, to get that deep, slightly bitter richness. Skip the cheap stuff; it shows in the flavor.
- Peanut butter: Creamy, natural peanut butter works best—salty and smooth, with a hint of roasted nuttiness. If you only have chunky, just give it a good stir until smooth.
- Graham cracker crust: I like it buttery and slightly crumbly, but if you’re out of graham crackers, digestive biscuits are a good swap, just crush them fine.
- Butter: Unsalted, for control over saltiness. I melt it until it’s just shimmering—don’t overdo it, or the crust gets greasy. The smell of toasted butter is a good sign.
- Cream: Heavy whipping cream makes the filling luscious. If you only have half-and-half, it’s still fine but won’t be quite as silky—still tasty, just a tad lighter.
- Eggs: Fresh eggs give the filling structure, but if you’re in a pinch, store-bought pasteurized eggs work too—just whisk well to avoid any rubberiness.
- Sugar: I use a mix of regular and brown sugar for depth. If you prefer less sweetness, cut back a bit—your palate, your rules.
Spotlight on key ingredients
Dark chocolate:
- I prefer a high cocoa percentage, around 70%, to get that deep, slightly bitter richness. Skip the cheap stuff; it shows in the flavor.
- Peanut butter: Creamy, natural peanut butter works best—salty and smooth, with a hint of roasted nuttiness. If you only have chunky, just give it a good stir until smooth.
- Graham cracker crust: I like it buttery and slightly crumbly, but if you’re out of graham crackers, digestive biscuits are a good swap, just crush them fine.
Peanut butter:
- Creamy, natural peanut butter works best—salty and smooth, with a hint of roasted nuttiness. If you only have chunky, just give it a good stir until smooth.
- Graham cracker crust: I like it buttery and slightly crumbly, but if you’re out of graham crackers, digestive biscuits are a good swap, just crush them fine.
Notes for ingredient swaps
- Dairy-Free: Swap heavy cream for coconut cream or cashew cream. Expect a slightly richer, coconutty flavor or nuttier profile.
- Vegan Chocolate: Use dairy-free dark chocolate or cacao nibs melted with coconut oil. Keep an eye on melting times; it may impact texture.
- Natural Peanut Butter: Opt for unsweetened, chunky peanut butter if you like more texture and less salt, but adjust the sweetness in the filling.
- Sweetener Alternatives: Maple syrup or agave nectar can replace sugar. They add a subtle flavor and moisture, but may alter the firmness slightly.
- Crust Base: Digestive biscuits or Oreo cookies (without cream) crushed finely make good substitutes for graham crackers, adding different flavor notes.
- Sugar: Coconut sugar or light brown sugar can deepen the caramel notes, but be aware they may slightly change the color and sweetness level.
- Extra Flavor: A pinch of sea salt or flaky salt on top enhances the peanut butter and chocolate contrast, especially if using sweeter ingredients.
Equipment & Tools
- Tart pan with removable bottom: To shape and bake the crust evenly
- Saucepan: To melt chocolate and prepare the filling
- Mixing bowls: For whisking ingredients and combining fillings
- Whisk: To blend ingredients smoothly
- Spatula: For spreading filling and pressing crust
- Food processor or plastic bag and rolling pin: To crush graham crackers into fine crumbs
Step-by-step guide to Chocolate Peanut Butter Tart
- Gather your equipment: a 23cm (9-inch) tart pan with removable bottom, a saucepan, mixing bowls, a whisk, a spatula, and a food processor or plastic bag and rolling pin for crust.
- Preheat oven to 180°C (350°F). Prepare the crust: crush graham crackers (about 1 1/2 cups) into fine crumbs using a food processor or by sealing in a plastic bag and crushing with a rolling pin.
- Mix crumbs with 1/2 cup melted unsalted butter and a tablespoon of sugar until well combined. Press the mixture evenly into the tart pan, pressing firmly on the bottom and up the sides.
- Bake crust for 10 minutes, until fragrant and slightly golden. Remove from oven and set aside to cool slightly.
- Make the filling: in a saucepan, melt 200g (7 oz) dark chocolate (about 70% cocoa) over low heat, stirring constantly until smooth. Remove from heat and let cool slightly.
- In a mixing bowl, whisk together 3/4 cup creamy peanut butter, 1 cup heavy cream, 1/2 cup sugar, and 2 eggs until smooth and slightly thickened. Gradually add the melted chocolate, whisking constantly to combine.
- Pour the filling into the cooled crust, spreading evenly with a spatula. Tap the pan gently on the counter to smooth out the surface and remove air bubbles.
- Bake the tart for 20-25 minutes at 180°C (350°F). The edges should be set but the center still slightly jiggles when gently shaken.
- Remove from oven and let cool at room temperature for 30 minutes, then refrigerate for at least 2 hours or until fully chilled and set.
- Before serving, optionally garnish with chopped peanuts, a drizzle of melted chocolate, or a dollop of whipped cream. Slice with a warm knife for clean cuts.
Chill the tart in the fridge for at least 2 hours until fully set. Slice with a warm knife, serve directly from the fridge for best texture. Garnish as desired just before serving.
How to Know It’s Done
- Crust is golden and firm when baked; edges slightly pulled away from pan.
- Filling is glossy, smooth, and jiggles just slightly in the center when cooled.
- Chocolate-peanut butter mixture is set and holds shape when sliced.
Chocolate Peanut Butter Tart
Ingredients
Equipment
Method
- Crush the graham crackers into fine crumbs using a food processor or by sealing them in a plastic bag and crushing with a rolling pin. Transfer the crumbs to a mixing bowl.
- Mix the melted butter and a tablespoon of sugar into the crumbs until evenly coated and crumbly. Press this mixture firmly into the bottom and slightly up the sides of your tart pan to form the crust.
- Bake the crust in a preheated oven at 180°C (350°F) for about 10 minutes until fragrant and slightly golden. Remove from the oven and let cool while you prepare the filling.
- In a saucepan, melt the dark chocolate over low heat, stirring constantly until smooth and glossy. Remove from heat and set aside to cool slightly.
- In a mixing bowl, whisk together the peanut butter, heavy cream, and eggs until the mixture is smooth and slightly thickened. Add in the sugar and whisk to combine.
- Gradually pour the cooled melted chocolate into the peanut butter mixture, whisking constantly to create a silky, unified filling.
- Pour the filling into the cooled crust, smoothing the top with a spatula. Gently tap the tart pan on the counter to release any air bubbles and create an even surface.
- Bake the tart in the oven at 180°C (350°F) for 20–25 minutes until the edges are set but the center still jiggles slightly when gently shaken.
- Remove the tart from the oven and let it cool at room temperature for about 30 minutes. Then, refrigerate for at least 2 hours until fully chilled and set.
- Garnish with chopped peanuts, melted chocolate drizzle, or whipped cream as desired. Slice with a warm knife for clean cuts and serve chilled.
Notes
Pro tips for perfect tart slices
- Bolded mini-head: Use room temperature eggs to ensure a smooth, even filling that bakes uniformly.
- Bolded mini-head: Melt chocolate slowly over low heat to avoid burning, and stir constantly for glossy richness.
- Bolded mini-head: Press crust firmly into the pan to prevent crumbling when slicing later.
- Bolded mini-head: Chill the tart thoroughly—at least 2 hours—so the filling firms up and slices cleanly.
- Bolded mini-head: For a shiny top, gently brush with a little melted chocolate or warm ganache before serving.
- Bolded mini-head: When baking, keep an eye on the edges—if they brown too quickly, tent loosely with foil.
- Bolded mini-head: Use a warm (not hot) knife to cut through the set tart for smooth, clean slices.
Common mistakes and how to fix them
- TOO LITTLE CRUST: Pack it firmly, or it crumbles. Use the back of a spoon to press evenly.
- UNDER-BAKED: Crust should be golden and fragrant. Bake longer if it looks pale or feels soft.
- FILLING TOO RUNNY: Ensure chocolate is slightly cooled before mixing; hot chocolate makes it too thin.
- OVER-BAKED: If center cracks or looks dry, reduce baking time or oven temperature slightly.
Fast fixes and pantry swaps
- If sauce separates, splash in a teaspoon of hot water and whisk vigorously.
- When tart cracks, patch with a dab of warm chocolate and smooth with a spatula.
- DUMPED too much salt? Rinse briefly under cold water before baking to tone down excess.
- Over-torched crust? Shield edges with foil and lower oven temp for a gentler bake.
- When filling is too runny, chill briefly or add a pinch of cornstarch to thicken quickly.
Prep, store, and reheat tips
- Prepare the crust and bake it a day in advance. Once cooled, store it in an airtight container at room temperature for up to 2 days, keeping it crisp and fresh.
- The filling can be made a day ahead; keep it covered in the fridge. Its flavor deepens overnight, and it remains smooth and luscious.
- Store the assembled tart—covered tightly with plastic wrap—in the fridge for up to 24 hours. The flavors meld beautifully, but the crust may soften slightly.
- Reheat gently in the fridge for about 10 minutes at room temp or serve chilled. The filling stays silky, and the crust retains some crispness if eaten soon after chilling.
Top questions about Chocolate Peanut Butter Tart
1. Can I use natural peanut butter?
Yes, using natural peanut butter makes the filling richer and more flavorful, but it might be a bit thicker and less sweet.
2. Can I substitute chunky peanut butter?
You can, but the texture might be different—chunky peanut butter will add more crunch, and natural kinds may make the filling slightly less smooth.
3. Is this recipe dairy-free?
Absolutely. Dairy-free options like coconut cream or cashew cream work well, but expect a slightly different flavor and creaminess.
4. How long can I store the tart?
Refrigerate the tart covered for up to 2 days. The flavors deepen, but the crust may soften; best enjoyed within that window.
5. Can I freeze the tart?
Yes, you can freeze the baked tart for up to a month. Wrap it tightly, then defrost in the fridge overnight before serving.
6. How do I get a shiny top on the tart?
To get a shiny top, gently heat some extra chocolate and brush it on just before serving for that glossy finish.
7. How do I know when it’s baked enough?
Overbaking can cause cracks. Keep an eye on it—center should jiggle slightly and edges be golden but not burnt.
8. How do I get neat slices?
Use a warm knife to cut through the set tart for clean, smooth slices without cracking or squishing the filling.
9. What if the filling is too soft?
If the filling is too runny, chill it briefly or add a teaspoon of cornstarch dissolved in cold water to thicken quickly.
10. What if the chocolate isn’t melting properly?
Splash a little hot water on the chocolate when melting if it’s too thick or isn’t melting evenly.
This tart isn’t just a dessert; it’s a trip back to childhood afternoons with a grown-up twist. The rich chocolate, salty peanut butter, and buttery crust come together in a way that feels both indulgent and familiar. It’s a reminder that simple ingredients, treated well, can create something truly memorable.
Sharing this tart feels like passing along a secret recipe for comfort, wrapped in sophistication. Whether enjoyed with friends or savored quietly on your own, it’s a treat that sparks a little joy and nostalgia each time you make it.