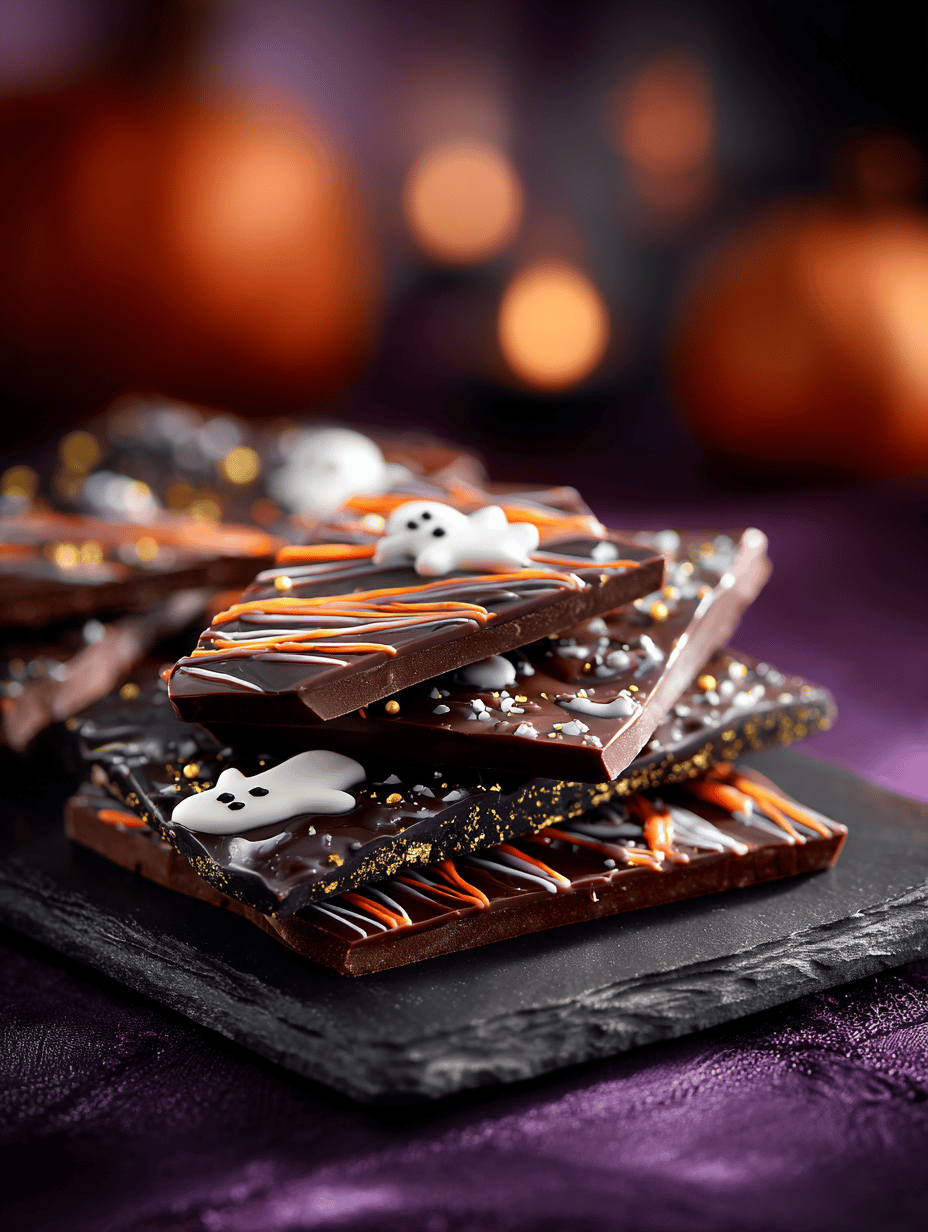
Most Halloween treats lean on the spooky, the gooey, or the overly sweet. But I’ve found a little nook for something unexpectedly elegant—Halloween bark that’s as playful as it is surprisingly sophisticated. It’s a way to elevate a simple chocolate sheet into something that’s both fun and a little rebellious.
This isn’t your typical candy. I love how the contrast of dark chocolate and bright, unexpected toppings feels like a quiet secret. Plus, it’s crazy easy to customize, making it perfect for last-minute parties or a solo treat while watching horror flicks. Honestly, it’s become my favorite way to get into the spooky spirit without the sugar overload.
And did I mention how flexible it is? You can swap out toppings, add a dash of spice, or keep it minimalist. It’s a small canvas that invites mischief and creativity—exactly what I want this season. If you’re tired of the usual, this bark might just surprise you.
A Memory in Every Crunch: Why I Keep Coming Back to This Bark
- Joy floods in when I see the glossy, dark chocolate crack open—reminds me of childhood trick-or-treat nights. It’s a simple pleasure that’s still just as thrilling.
- Chaos in the kitchen—spilled sprinkles, melted chocolate everywhere—and I wouldn’t change a thing. It’s messy, and it’s honest.
- Nostalgia hits hard with the crunch of toasted nuts and the smoky scent of caramel drizzled over cold chocolate. It’s a snapshot of fall evenings.
- My pride swells with each batch I make—crafting something that’s both fun and a little fancy, perfect for sharing or keeping all to myself.
- Relief when the toppings stay put, the chocolate sets perfectly, and I can finally sit down. That first satisfying crack is worth every second of patience.
Ingredients Are Like Characters in My Halloween Play
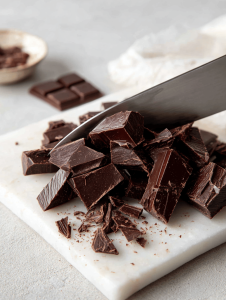
- Dark chocolate: I use high-quality 70% cocoa, but milk chocolate works if you prefer a sweeter bite. It melts smoothly, filling the air with that rich, cocoa aroma.
- Sprinkles & edible glitter: Bright, playful, and a little chaotic—perfect for that spooky sparkle. Swap for chopped dried fruit if you want a more natural vibe.
- Toasted nuts: I love pecans—they add a smoky crunch. Almonds or walnuts are good, too, if you’re feeling traditional.
- Caramel drizzle: Oozy and golden, it adds a sticky sweetness. If you don’t have caramel, a drizzle of honey works in a pinch.
- Chili flakes or sea salt: Just a pinch to heighten flavors and add a surprising kick. Skip if you want plain sweet.
Let’s Get This Spooky Show on the Road: How to Make Halloween Bark
Equipment & Tools
- Silicone spatula: For smooth spreading and scraping bowls clean.
- Baking sheet: A sturdy, rimmed sheet to hold your chocolate.
- Parchment paper: Keeps everything neat and easy to lift.
- Double boiler or microwave: For melting chocolate gently.
- Cooling rack: To set the bark without sticking.
Mise en Place
- Chop nuts, measure toppings, and set aside.
- Line baking sheet with parchment paper.
- Break chocolate into pieces for melting.
Steps
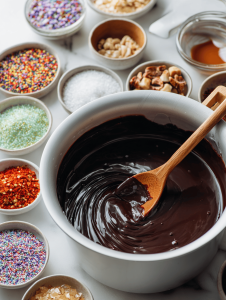
- Melt chocolate in double boiler or microwave at 30-second bursts, stirring each time until smooth, about 2-3 minutes.
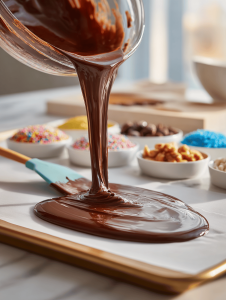
- Pour melted chocolate onto prepared baking sheet, spread evenly with spatula to about 1/4 inch thick.
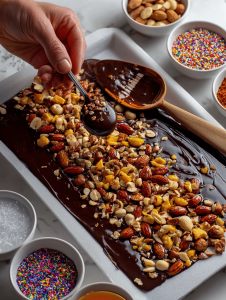
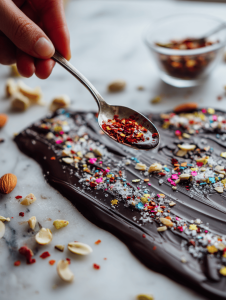
- Sprinkle toppings quickly before chocolate cools—think bright sprinkles, nuts, and a pinch of chili flakes.
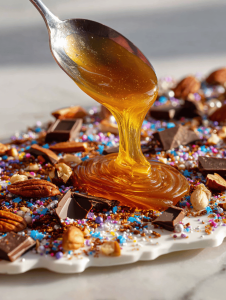
- Drizzle caramel or honey in squiggly lines for a glossy finish.
- Place in fridge for 30-60 minutes until firm, about 15°C/59°F.
- Once set, break into irregular pieces, ready to serve or store.
Resting & Finishing
Let the bark rest in the fridge until firm, then peel away parchment and break into shards. No need to handle too much—fragile, crispy edges await.
Serve on a platter, or pack into bags for a spooky gift. The crunch should be satisfying, the toppings intact, and the chocolate glossy.
Checkpoints & How to Know It’s Done
- Chocolate feels firm and cracks when pressed with a fingernail.
- Color is deep and glossy, no streaks or dull patches.
- Edges are crisp, and toppings stay put when you break a piece.
Oops Moments & How to Fix Them Without Losing Your Cool
- FORGOT to temper? Just melt again gently and re-cool for a shiny finish.
- DUMPED too many toppings? Shake off excess and press lightly into the surface.
- OVER-TORCHED chocolate? Add a spoon of coconut oil and stir until smooth.
- SPILLED chocolate? Use a paper towel to clean immediately, then re-melt excess for patching.
Quick Fixes for Kitchen Chaos
- When chocolate seizes, splash in a teaspoon of vegetable oil and stir gently.
- Patch cracks with melted leftover chocolate—works like magic.
- Shield toppings with a light spray of cooking spray if they slide off during setting.
- When toppings fall off, reapply with a dot of melted chocolate as glue.
- If chocolate cools too fast, warm it slightly to regain pourability. Smells rich and inviting.
By now, your kitchen should smell like a chocolate factory with a hint of spice. The best part? Watching the toppings settle into that glossy, crackly surface. It’s a little act of rebellion—making something beautiful out of chaos, just like Halloween itself.
Once you get the hang of it, this bark becomes a seasonal tradition. No matter how crazy things get outside, inside your kitchen, there’s a quiet moment of creation. That’s the real treat—simple, imperfect, and entirely yours.
Halloween Chocolate Bark
Ingredients
Equipment
Method
- Chop the dark chocolate into small pieces for easier melting, and set aside. Line your baking sheet with parchment paper to keep everything neat.
- Gently melt the chocolate using a double boiler or microwave in 30-second bursts, stirring each time until smooth and glossy. The aroma of rich cocoa will fill the air as it melts.
- Pour the melted chocolate onto the prepared baking sheet, then use a silicone spatula to spread it evenly to about 1/4 inch thickness. The surface should be shiny and smooth.
- Sprinkle bright sprinkles and edible glitter quickly over the surface before the chocolate cools and sets. The toppings will stick as the chocolate begins to firm.
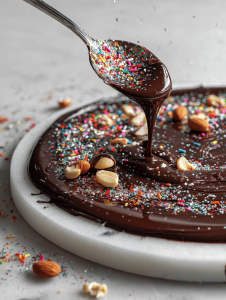
- Scatter the toasted nuts evenly across the surface, pressing them lightly into the chocolate for better adherence. The toasted aroma complements the dark chocolate beautifully.
- Drizzle caramel or honey in squiggly lines over the toppings for a glossy, sticky finish. The caramel will add a golden shimmer and extra sweetness.
- Sprinkle a pinch of chili flakes or sea salt over the surface for an unexpected spicy or savory note. This contrast enhances the flavor profile.
- Place the baking sheet in the fridge and let the bark chill for 30 to 60 minutes until fully firm. The chocolate will crackle softly as it sets.

- Once set, remove the sheet from the fridge and peel away the parchment paper. Break the chocolate into irregular shards with your hands for a rustic look.
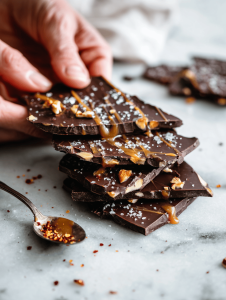
- Arrange the shards on a serving platter or pack into small bags for gifting. The final bark should be crisp, glossy, and visually playful.

In the end, this Halloween bark isn’t just about the candy or the toppings. It’s about the messy joy of making something with your own hands, even if it doesn’t turn out perfect. Sometimes, those quirks turn into the best stories, the kind you’ll tell every year.
So, let it crack, let it break, and let it be a little wild. The season’s charm lives in these small, imperfect moments—getting a little sticky, a little spooky, and totally delicious.