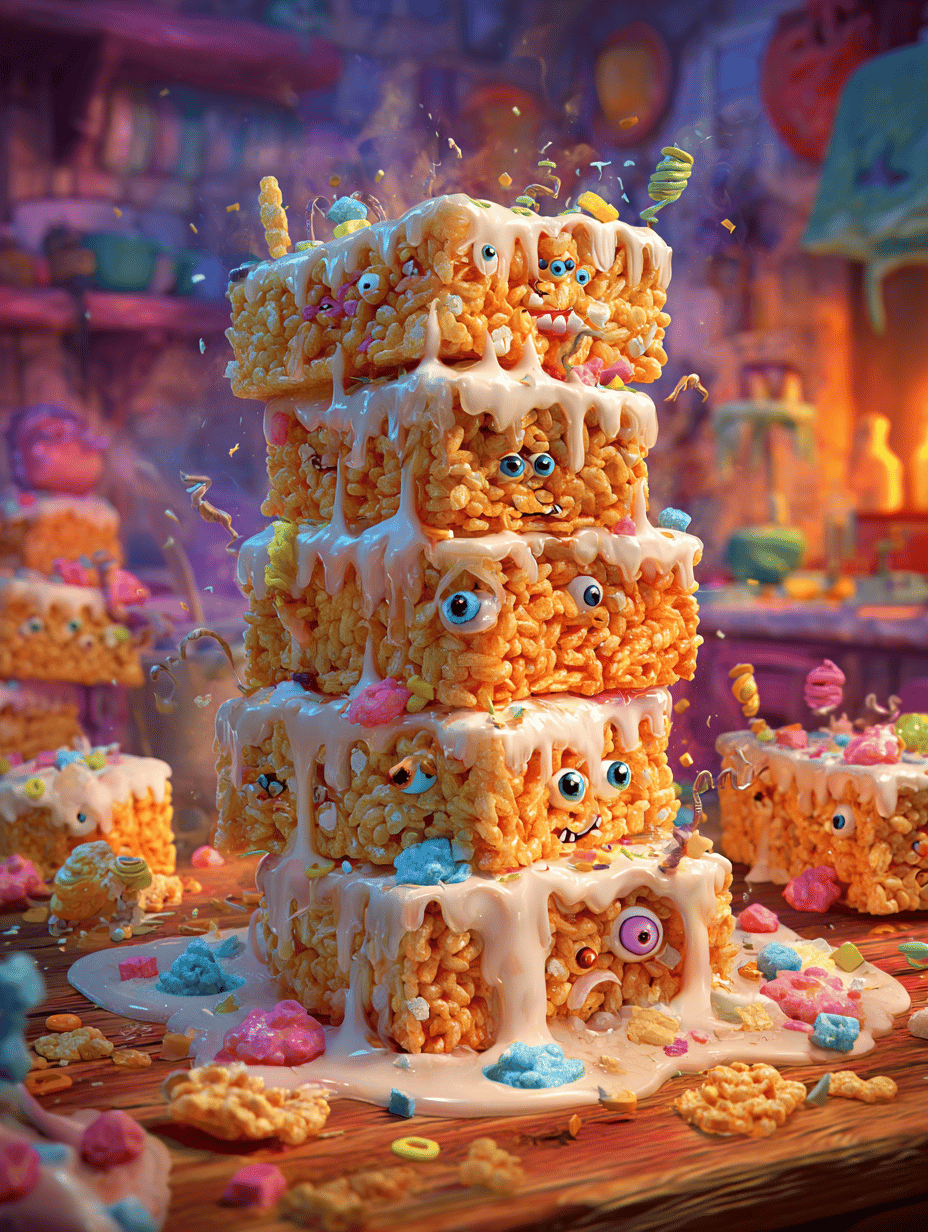
Every once in a while, you need a treat that defies the usual. These monster Rice Krispie treats are my answer to that craving—a giant, gooey, messy stack of sticky cereal goodness that demands attention. They’re not just snacks; they’re a celebration of chaos in the best way.
When I first made these, I wanted something that would bring everyone to the table—something playful and a little wild. The best part? Watching the layers get all melty and oozy as you pull a piece apart. It’s a messy, joyful kind of dessert, perfect for sharing or keeping all to yourself.
They remind me of childhood afternoons spent elbow-deep in cereal bowls, but with a grown-up twist of richness and texture. No fancy tools needed—just a bit of patience and a good sense of humor. Sometimes, the best recipes are the ones that don’t take themselves too seriously.
What I love about this monster mash-up
- Joy erupts when I see that giant, sticky mound on the cooling rack—pure chaos in edible form.
- Relief washing over me when I realize I don’t need perfect cuts—just love and a little patience.
- Pride in making something that’s both nostalgic and totally unique—nothing like a store-bought treat.
- The chaos of pulling apart a gooey piece, watching marshmallow stretch and cereal crunch—sensory overload.
- Memory of childhood afternoons, now amplified into a giant, irresistible dessert.
Ingredient secrets behind the monster
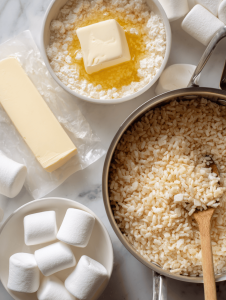
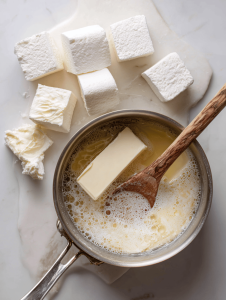
- Marshmallows: I use big, fluffy bags for that melt-in-your-mouth goo—skip the mini versions if you want stretchiness.
- Butter: Adds richness and helps everything stick together—don’t skimp, especially if you want that glossy finish.
- Crispy rice cereal: Classic, but I like a slightly toasted variety for extra flavor—think smoky crunch.
- Chocolate chips: Melty and oozing—use milk or dark depending on your mood. They add a luscious layer of sweetness.
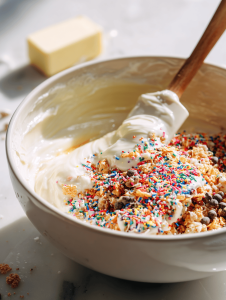
- Decorative toppings: Think sprinkles, mini candies, or even edible glitter—whatever makes your chaos colorful and fun.
- Optional: a pinch of sea salt—brightens the sweetness and enhances marshmallow’s aroma.
- For a different vibe, swap in gluten-free cereal—just check the packaging for that crunch factor.
The messy magic: step-by-step chaos
Equipment & Tools
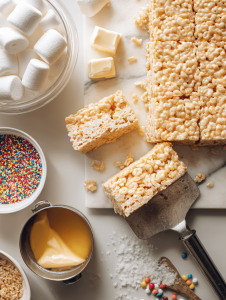
- Large saucepan: for melting marshmallows and butter—big enough to stir without splashes.
- Spatula: silicone preferred—flexible for scraping every bit of goo.
- 9×13 inch baking dish: for shaping the treats—lined with parchment for easy removal.
- Cooling rack: optional, but helps set the treats evenly.
- Measuring cups and spoons: for precision—marshmallow and cereal ratios matter.
Mise en place
- Measure marshmallows, butter, and cereal beforehand.
- Line the baking dish with parchment paper.
- Gather toppings and decorations.
- Set everything within arm’s reach for smooth workflow.
Steps
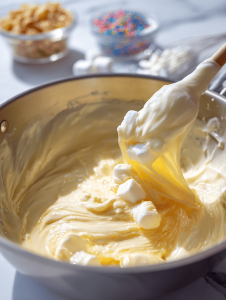
- Heat the saucepan over medium (160°C/320°F). Melt butter, then add marshmallows—stir until smooth and glossy, about 3 minutes.
- Remove from heat. Quickly fold in cereal and toppings—use a spatula to coat thoroughly.
- Transfer mixture into prepared dish. Press down firmly with a spatula or buttered hands—avoid smashing too hard.
- Let it rest at room temp for 30 minutes, or until set and slightly firm.
- For even slices, use a sharp knife—clean it between cuts for neat pieces.
Resting & Finishing
Let the treats cool completely before slicing. Add extra toppings or sprinkles on top, pressing gently for adhesion. Serve in big, messy squares—embrace the goo.
How to know it’s done
- Marshmallow mixture is glossy, not dull—glossy indicates proper melt.
- Edges are slightly browned, with a firm crust forming.
- When pressed, treats feel firm but give with a chewy center.
Oops moments & how to fix them
- FORGOT to butter the pan? Spray it lightly or line with parchment—no sticking mess.
- DUMPED too much cereal? Add a splash more melted marshmallow to balance the crunch.
- OVER-TORCHED marshmallow? Stir in a spoonful of cream or milk to loosen the mixture.
- SEEN the treats crack when slicing? Let them rest longer—better set equals cleaner cuts.
Kitchen hacks to save the chaos
- When mixture is too sticky, splash a little warm water on your hands before pressing.
- Splash a tiny bit of vanilla extract into marshmallows for extra aroma.
- Patch cracks by pressing extra toppings into the surface before cooling.
- Shield your hands with buttered gloves for easier pressing and shaping.
- When in doubt, microwave marshmallow bag for 10 seconds—easier to melt smoothly.
These giant treats aren’t about perfection—they’re about the joy of messy, sweet chaos. Watching marshmallows melt and cereal crunch together is a reminder that sometimes, the best moments are the unplanned ones. No matter how wild it gets, they’re always a hit at the table or on the counter.
Plus, there’s something oddly satisfying about pulling apart that stretch of goo, knowing you made it. These monster Rice Krispie treats are perfect for when you need something playful, a little chaotic, and totally delicious—no apologies, just pure sweet messy fun.
Giant Monster Rice Krispie Treats
Ingredients
Equipment
Method
- Measure out all your ingredients, lining up marshmallows, butter, and cereal for an easy flow.
- Heat your large saucepan over medium heat, and melt the butter until it’s bubbling and fragrant.

- Add the marshmallows to the melted butter, stirring constantly until they melt into a glossy, gooey mixture, about 3 minutes.
- Remove the pan from heat once the marshmallows are fully melted and shiny—your kitchen will smell sweet and buttery.
- Quickly fold in the cereal and toppings using a spatula, ensuring everything gets coated evenly in the marshmallow goo.
- Transfer the sticky mixture into a prepared 9x13 inch dish lined with parchment paper, pressing down firmly but gently to shape the giant treat.

- Press extra toppings or sprinkles into the surface for colorful chaos, then let it rest at room temperature for about 30 minutes to set.
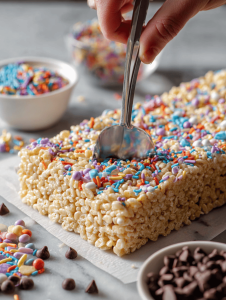
- Once set, use a sharp knife to cut into large, messy squares—clean the knife between cuts for neat slices.
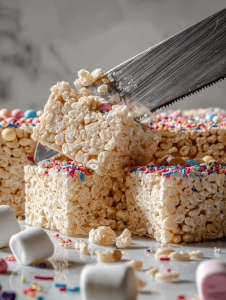
- Serve immediately or store in an airtight container for a delightfully gooey, chewy, and crunchy chaos that everyone will love.
Notes
In the end, these treats aren’t just about indulging—they’re about embracing the chaos of good food. Every sticky, crunchy bite is a reminder that some of the best moments happen when we let go a little. They’re perfect for lazy weekends or bringing a little wildness to a simple gathering.
Once they’re gone, I find myself already thinking about the next batch—maybe with a drizzle of caramel or a handful of colorful candies. But for now, I’ll just enjoy the messy remnants and the memories of a dessert made with a little chaos, a lot of love, and plenty of sweet, sticky fun.